Confidential Flask Example
On the first day, we have built an application consisting of a single service. Our objective for the 2nd day is to combine multiple services -- actually two services - into one application. This application consists of
- of custom confidential flask-based application code, and
- a standard confidential redis service.
Building a Confidential Flask-Based Application using sconectl
We demonstrate with the help of a simple Flask-based Service multiple features of the SCONE platform:
- we show that we can execute unmodified Python programs inside of SGX enclaves
- we show how to encrypt the Python program to protect the confidentiality and integrity of the Python code
- how to implicitly attest other services with the help of TLS, i.e., to ensure that one communicates with a service that satisfy its security policy.
- we demonstrate how Redis, an in-memory data structure store, and the Python flask attest each other via TLS without needing to change the code of neither Redis nor the Flask-based service.
- we show how to generate TLS certificates with the help of a policy:
- a SCONE security policy describes how to attest applications and services (i.e., describe the code, the filesystem state, the environment, the node on which to execute, and secrets).
- a SCONE policy can generate secrets and in particular, key-pairs and TLS certificates.
- we show how to execute this example
- on a generic Kubernetes cluster, and
Workflow
First, we build a Python image in a very similar way how we would build a native Python image. We specify a manifest service.yaml that contains a build section that specifies that we intend to build a Python image that deploys a Flask-based service. In this process, we need
- to install some dependencies that are defied in file
requirements.txt, - to copy one or more Python code files,
- to specify the arguments how the python engine should be started, and
- to give the generated image a name.
Second, we connect the Flask-based service via mTLS to a redis services. This redis service runs inside of an enclave too. The client and service TLS certificates are generated as part of a Scone policy.
Flask-Based Confidential Service
We implement a simple Flask-based service. The Python implements a REST API:
- to store patient records (i.e., POST to resource
/patient/<string:patient_id>) - to retrieve patient records (i.e., GET of resource
/patient/<string:patient_id>) - to retrieve some score for a patient (i.e., GET of ressource
'/score/<string:patient_id>)
The Python code is executed inside of an enclave to ensure that even users with root access cannot read the patient data.
Quick Start
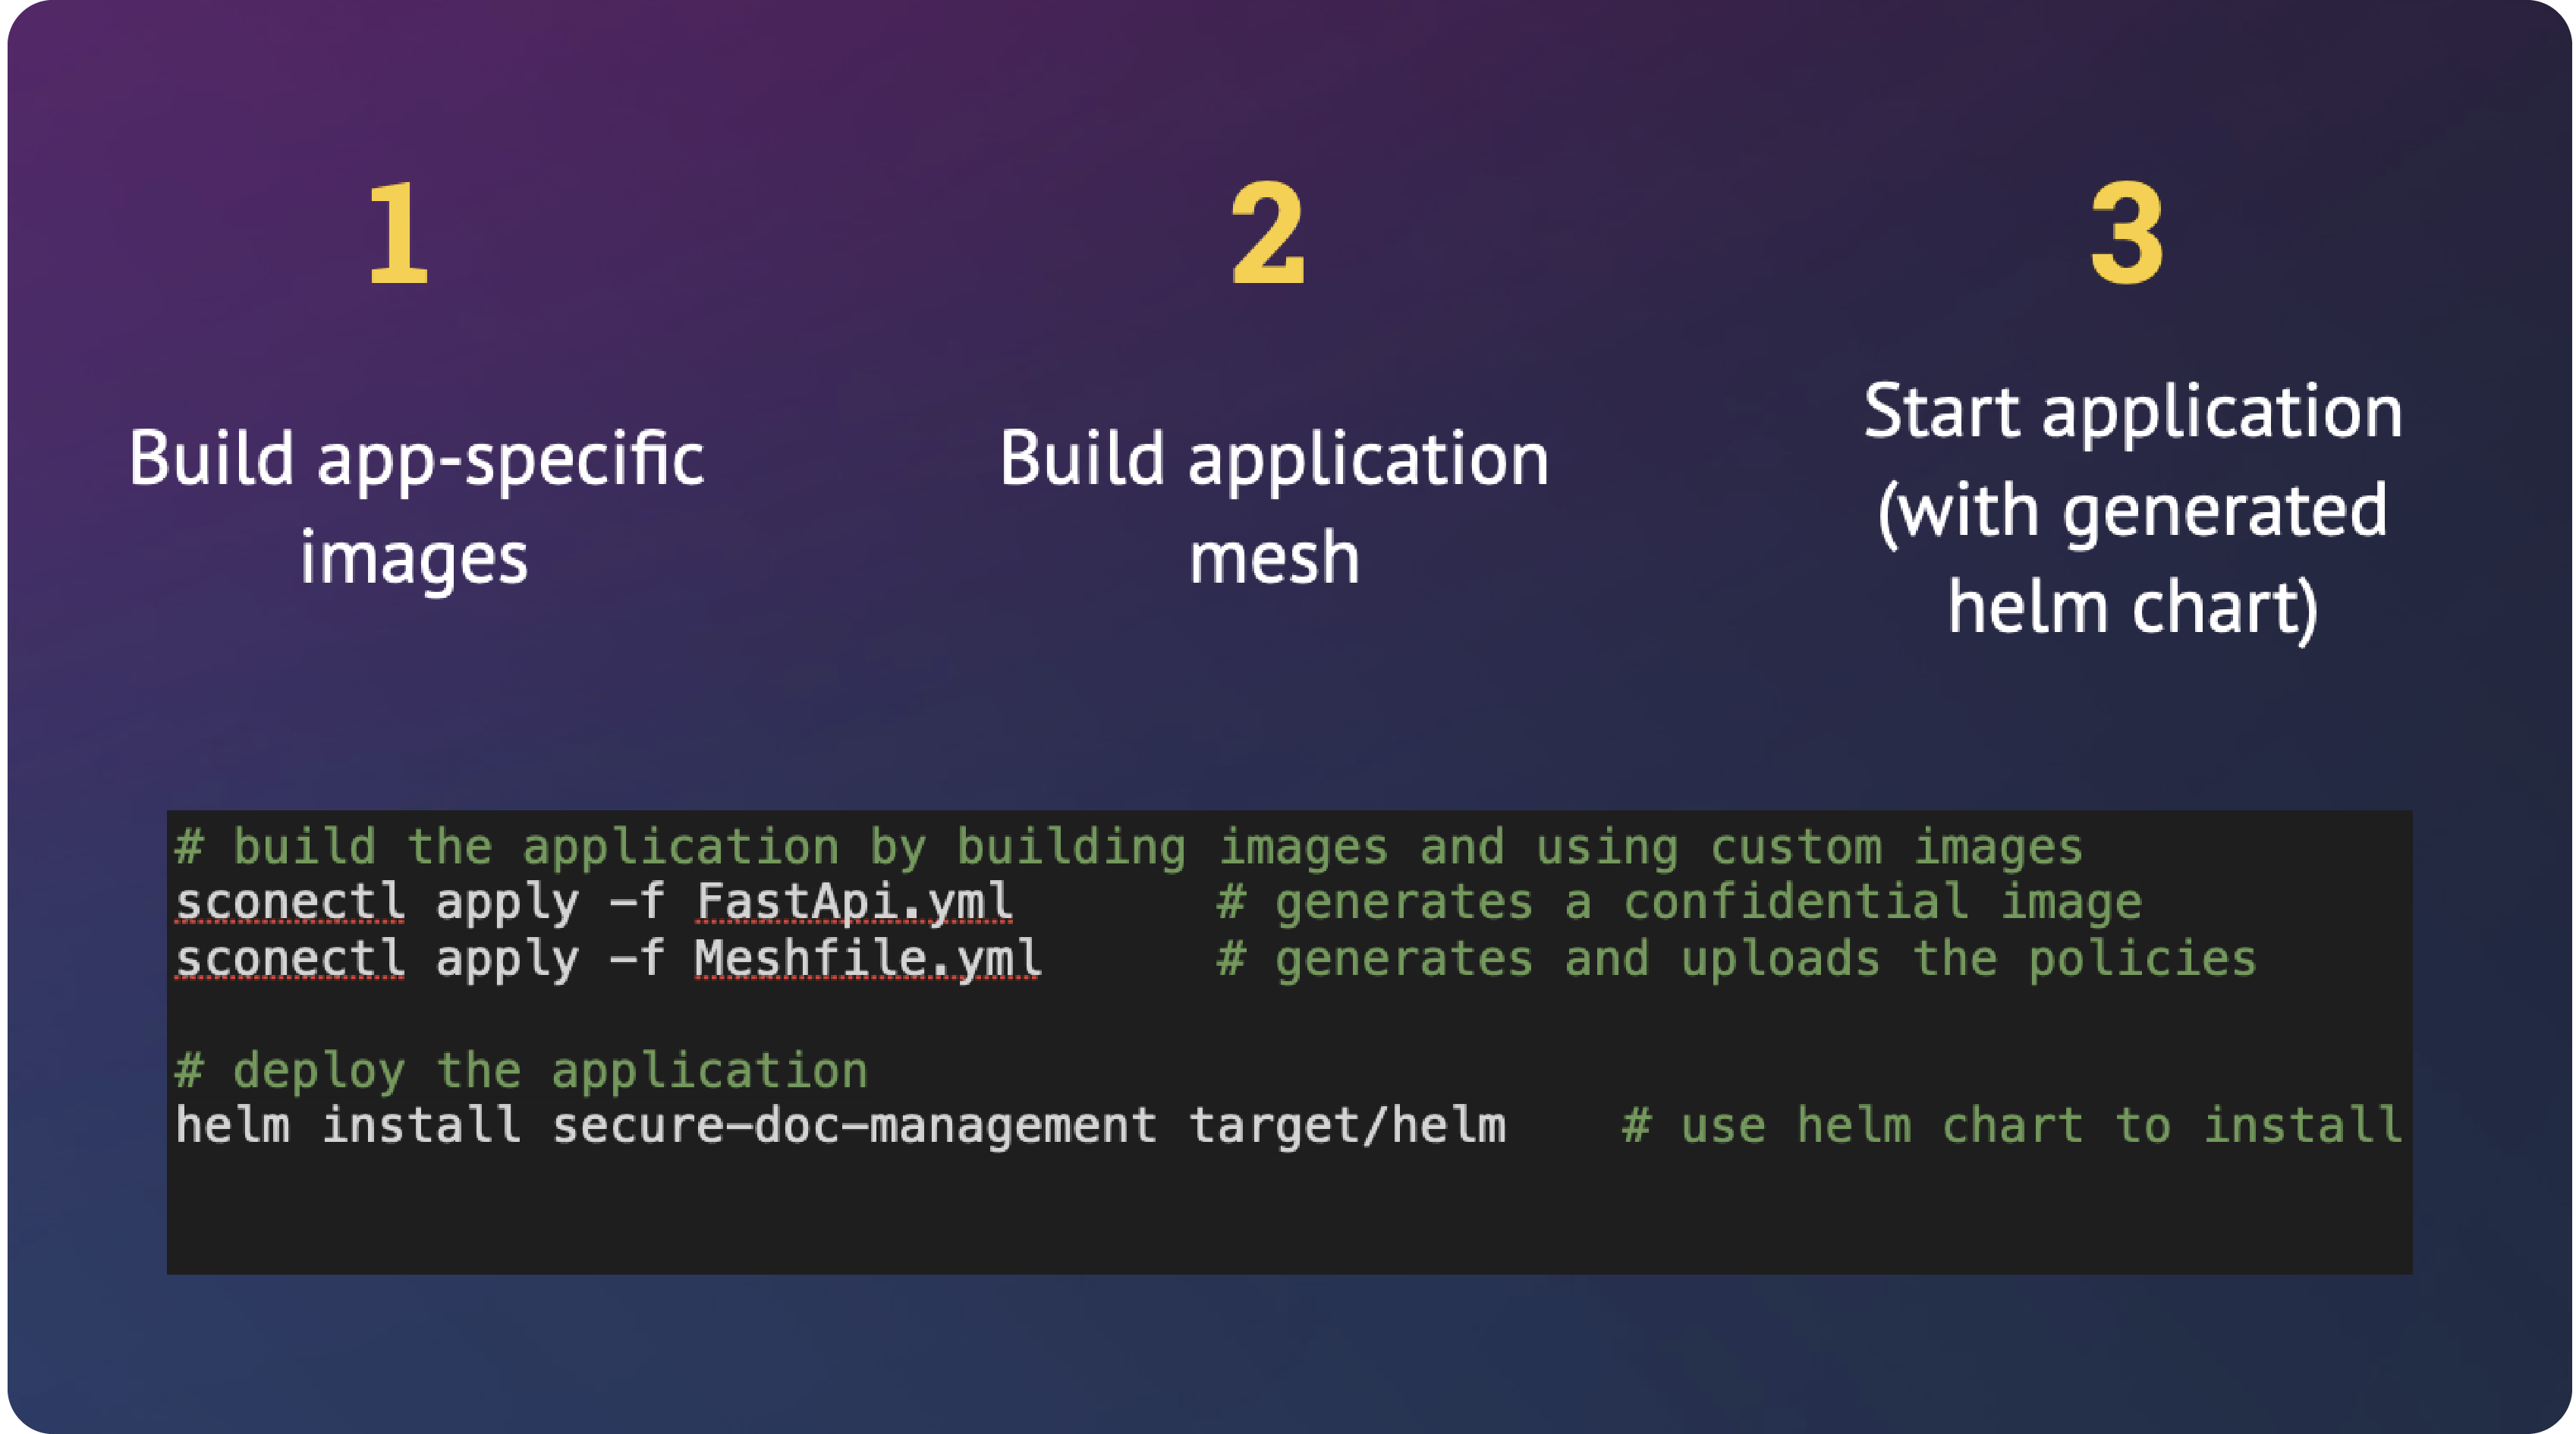
Once you have created your manifest files, you only need to perform the following three steps to build and run your confidential application on Kubernetes:
Note: Since the container repository and the namespace is under our control, you might want to change the image name to a repository to which you are permitted to push. Also, you might need to change the namespace.
- Build the service OCI container image (for each service):
sconectl apply -f service.yaml- Build and upload the security policies for all services of the application using:
sconectl apply -f mesh.yaml- The second step generates a
helmchart and you can start this application by executing:
helm install flaskredis target/helmThat's it! You can now inspect the output with kubectl (assuming you have kubectl command completion installed):
kubectl logs flaskredis<TAB>But in case you are interested in what is going on under the hood, we explain the steps in some more details below.
Setup
We have implemented sconectl in Rust. In case, you have Rust already installed, just execute:
cargo install sconectlTroubleshooting
Note: You can run script run.sh to set up / update your rust environment and to install sconectl with the help of Rust. It will also execute the remaining steps of this tutorial.
In case you install manually, errors might appear since Rust is not installed or out-of-date. If this cargo would fail, ensure that
- you have
Rustinstalled on your system. and - it is up-to-date (you might get syntax errors if your Rust installation is old).
If Rust is not yet installed or too old, you can use rustup to install Rust.
Background
TLS Certificates
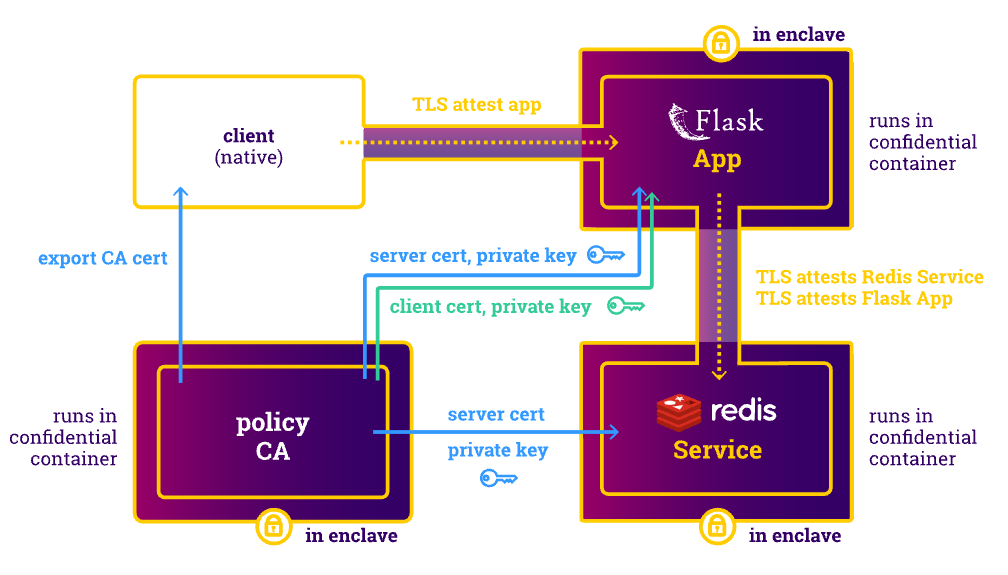
The service uses a Redis instance to store the resources. The communication between 1) the Flask-based service and its clients and 2) Redis and the application is encrypted with the help of TLS. To do so, we need to provision the application and Redis with multiple keys and certificates:
- Redis client certificate
- Redis server certificate
- Flask server certificate
Redis and the Flask-based service, require that the private keys and certificates are stored in the filesystem. We generate and provision these TLS-related files with the help of a SCONE policy.
To do so, we generate secrets related to the Flask-based service. We specify in the mesh.yaml that
- a private key (
api_ca_key) for a new certificate authority (CA) is generated - a certificate (
api_ca_cert) for a certification authority is generated - using the private key (i.e.,
api_ca_key), and - making this certificate available to everybody (see
export_public: true) - we generate a private key for the certificate used by the REST API (i.e.,
flask_key) - we generate a certificate (
flask) with the help of CAapi_ca_certand assign it a dns nameapi.
The SCONE policy is based on Yaml and the redis policy contains the following section to define these secrets:
secrets:
    - name: api_ca_key
      kind: private-key
    - name: api_ca_cert
      kind: x509-ca
      export_public: true
      private_key: api_ca_key
    - name: flask_key
      kind: private-key
    - name: flask
      kind: x509
      private_key: flask_key
      issuer: api_ca_cert
      dns:
        - api
The private keys and certificates are expected at certain locations in the file system. SCONE permits to map these secrets into the filesystem of the Flask-based service: these files are only visible to the service inside of an SGX enclave after a successful attestation (see below) and in particular, not visible on the outside i.e., in the filesystem of the container.
To map the private keys and certificates into the filesystem of a service, we specify in the policy which secrets are visible to a service at which path. In the flask policy this is done as follows:
images:
   - name: flask_restapi_image
     injection_files:
        - path: /tls/flask.crt
          content: $$SCONE::flask.crt$$
        - path: /tls/flask.key
          content: $$SCONE::flask.key$$
And in the Python program, one can just access these files as normal files. One can create a SSL context (see code):
app.run(host='0.0.0.0', port=4996, threaded=True, ssl_context=(("/tls/flask.crt", "/tls/flask.key")))While we do not show how to enforce client authentication of the REST API, we show how to do this for Redis in the next section.
TLS-based Mutual Attestation
The communication between the Flask-based service, say, S and Redis instance, say, R is encrypted via TLS. Actually, we make sure that the service S and instance R attest each other. Attestation means that S ensures that R satisfies all requirements specified in R's security policy and R ensures that S satisfies all the requirements of S's policy. Of course, this should be done without changing the code of neither S nor R. In case that S and R are using TLS with client authentication, this is straightforward to enforce. (If this is not the case, please contact us for an alternative.)
To ensure mutual attestation, the operator of Redis defines a policy in which it defines a certification authority (redis_ca_cert) and defines both a Redis certificate (redis_ca_cert) as well as a Redis client certificate (redis_client_cert). The client certificate and the private key (redis_client_key) are exported to the policy of the Flask service S. The policy for this looks like this:
secrets:
  - name: redis_key
    kind: private-key
  - name: redis # automatically generate Redis server certificate
    kind: x509
    private_key: redis_key
    issuer: redis_ca_cert
    dns:
     - redis
  - name: redis_client_key
    kind: private-key
    export:
    - session: $FLASK_SESSION
  - name: redis_client_cert # automatically generate client certificate
    kind: x509
    issuer: redis_ca_cert
    private_key: redis_client_key
    export:
    - session: $FLASK_SESSION # export client cert/key to client session
  - name: redis_ca_key
    kind: private-key
  - name: redis_ca_cert # export session CA certificate as Redis CA certificate
    kind: x509-ca
    private_key: redis_ca_key
    export:
    - session: $FLASK_SESSION # export the session CA certificate to client session
Note that $FLASK_SESSION is replaced by the unique name of the policy of S. The security
policies are in this example on the same SCONE CAS (Configuration and Attestation Service). In more complex scenarios, the policies could also be stored on separate SCONE CAS instances operated by different entities.
The flask service can import the Redis CA certificate, client certificate and private key as follows:
secrets:
    - name: redis_client_key
      import:
        session: $REDIS_SESSION
        secret: redis_client_key
    - name: redis_client_cert
      import:
        session: $REDIS_SESSION
        secret: redis_client_cert
    - name: redis_ca_cert
      import:
        session: $REDIS_SESSION
        secret: redis_ca_cert
These secrets are made available to the Flask-based service in the filesystem (i.e., files /tls/redis-ca.crt, /tls/client.crt and /tls/client.key) via the following entries in its security policy:
images:
   - name: flask_restapi_image
     injection_files:
        - path: /tls/redis-ca.crt
          content: $$SCONE::redis_ca_cert.chain$$
        - path: /tls/client.crt
          content: $$SCONE::redis_client_cert.crt$$
        - path: /tls/client.key
          content: $$SCONE::redis_client_cert.key$$