Confidential Hello World!
This tutorial shows how to provide a simple cloud-native application with a secret such that nobody (except for the program itself) can access the secret. Not even users with root privileges and cloud providers with hardware access can access it or modify the program.
Quick Start Guide
If you want to skip the introductory explanations, you can jump straight to the Quick Start Guide.
Verify the Desired Protection Level
Suppose you want to learn how to verify that the desired levels of confidentiality, integrity, and consistency protection are achieved. In that case, you can jump straight to Verify the Desired Protection Level.
Other Tutorials
We also have other tutorials, which you can check at this SCONE documentation website.
Troubleshooting Guide
If you have problems, you can consult our troubleshooting guide.

Motivation and Use Case Description
In our simple Hello World example, we pass a user ID and a password to a Python program. This is an API user and password, i.e., no human needs to or should know the password. Only authorized applications must have access to the password.

We want to execute this program in a typical environment that a cloud provider manages. More concretely, we want to run this program as a process running in a container running in a Kubernetes pod, running on a Kubernetes node, running in a VM running on a server running in some data center. So there are multiple nested layers one might need to be aware of. These days, one often outsources the management of these layers to an external cloud provider.
The cloud provider operates the hardware, the cloud stack, the operating system, and Kubernetes. Relying on the cloud provider to do all this decreases the complexity of running a cloud application. Still, it usually also forces us to give a lot of power and trust to the cloud provider. The SCONE platform, however, allows us not to have to trust and provide this power to neither the cloud provider nor malicious root users.
Using SCONE, despite not having complete control of neither the hardware nor the software setup, we can ensure that nobody (except for the program itself) can change or read our password or can change the user ID or other parts of the program. We also ensure that we always run the desired version of our program.
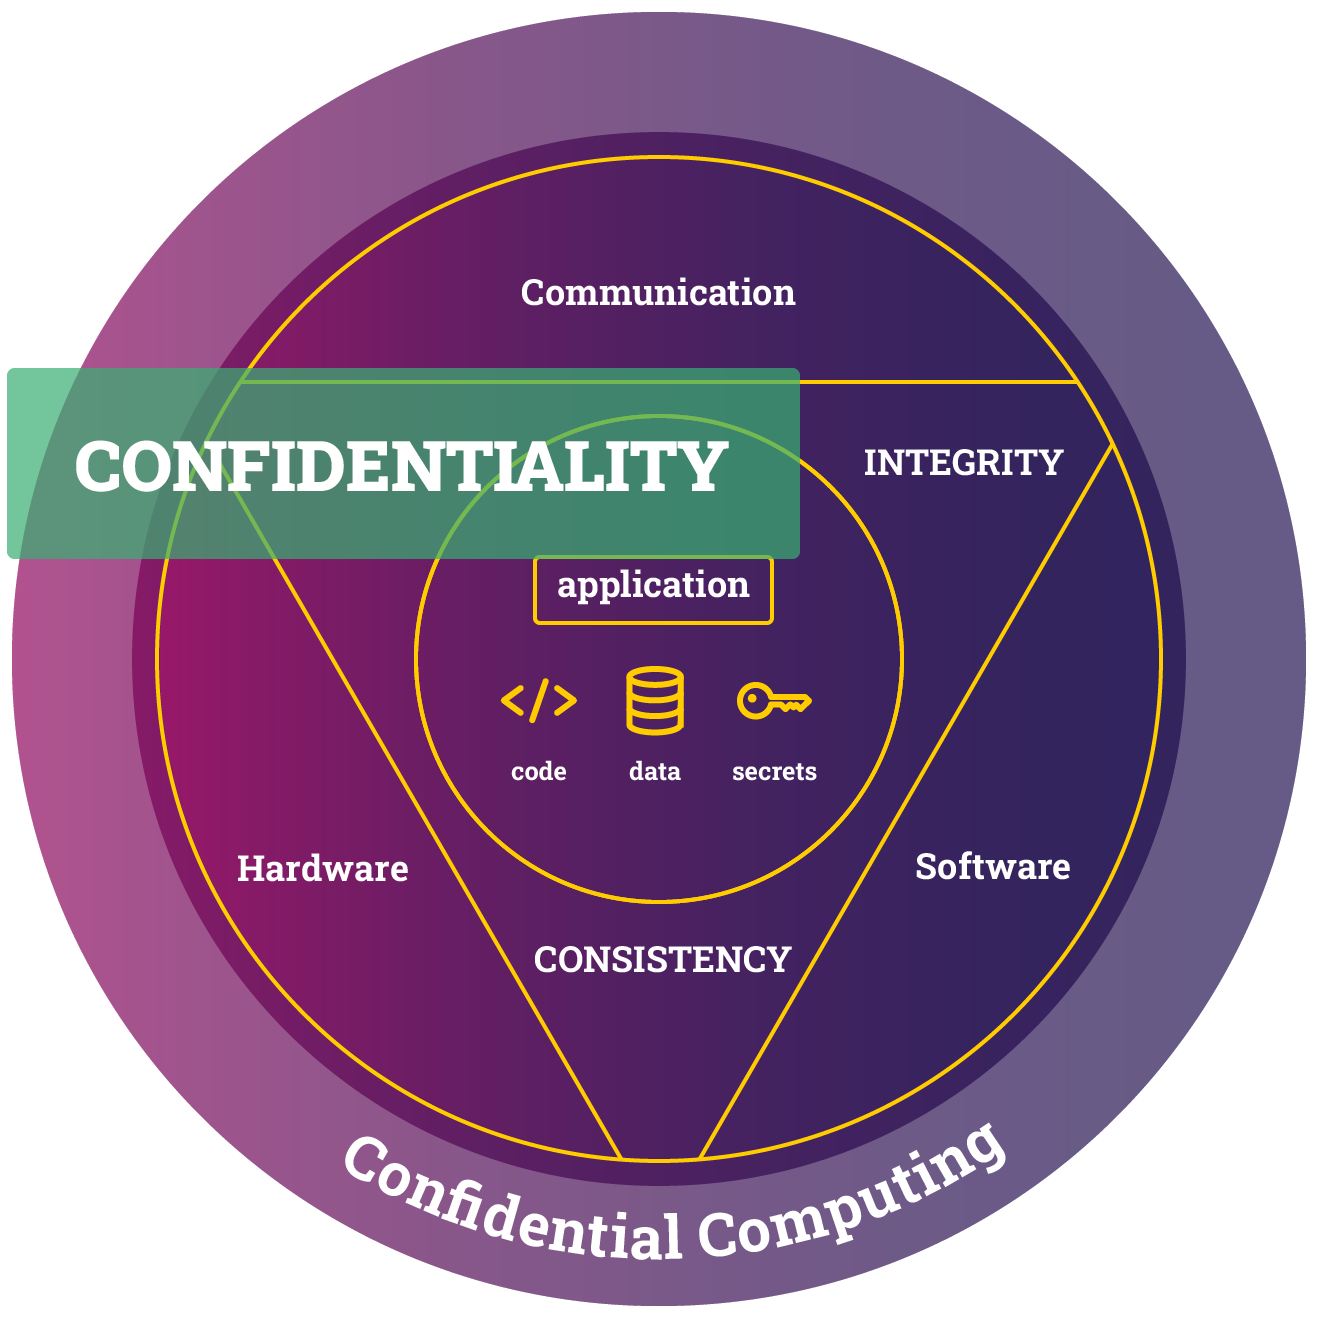
Objectives
The desired level of protection is a design choice made by the application owner. Even if this choice changes, the program does not need to be changed.
 is not made available or disclosed to unauthorized individuals, entities, or processes.")
Our objectives in this tutorial are to provide:
- confidentiality, integrity and consistency protection of our secret,
- integrity and consistency protection of the program and user ID.
Confidentiality
Confidentiality protected means that the protected resource cannot be read by entities not authorized by the application's security policy.
Integrity
Integrity protected means that the protected resource can only be modified by entities authorized by the application's security policy. All other changes are automatically detected and cause the program to terminate.
Consistency
Consistency protected means that changing the version of the protected resource will be detected and cause the program to terminate unless the application owner authorizes a software update.
This means that in this tutorial, we let the program and the user ID be readable but not changeable, and the password to be neither. These properties hold even for people with root access and physical access to the hardware.
Code Confidentiality
Using SCONE, it is also possible to protect the confidentiality of the code so that nobody can view the program, but we do not include this feature in this example.
Quick Start Guide
Clone the following git repo:
git clone https://github.com/scontain/scone_mesh_tutorialto get access to the code of this tutorial.
Step 0: Requirements
Many development systems will already have most of the necessary
software installed. We provide a bash shell script to verify this
and install what is missing. Run:
./check_prerequisites.shto automatically perform the following actions:
- Update and/or install rust and cargo.
- Install the SCONE command line tool
sconectlif not already present. - Check whether docker, helm and kubectl are installed.
Installing Prerequisites
If rust or cargo are missing, check_prerequisites.sh installs them, which relies on curl being installed on your system.
Manual Installation
Alternatively, to use the check_prerequisites.sh script, you can install sconectl manually by executing cargo install sconectl.
Getting help
For information on how to use sconectl, run sconectl --help
Apart from installing the software handled by the check_prerequisites.sh script,
you also need:
- read and write access to a container registry where you want to store your container image with the Hello World service.
- Access to a Kubernetes cluster, to which you want to deploy your Hello World application.
kubeconfig
** Assuming you have a kubeconfig file, you can get access to the cluster by:
1. putting your kubeconfig file at ~/.kube/config, or
2. setting your $KUBECONFIG environment variable to point to it, or
3. adding the option --kubeconfig /path/to/your/kubeconfig.file to each of the following kubectl commands.
- On your Kubernetes cluster, the SCONE SGX Plugin service and the SCONE LAS service needs to be installed. The easiest way to deploy these is to use the SCONE Operator.
Authorization
If you are not authorized to use the default Kubernetes namespace, you will have to ask somebody with access to install the SCONE SGX Plugin service and the SCONE LAS service.
Although all the kubectl (as well as the helm and run.sh) commands in the rest of this tutorial also are using the default namespace, you can, in those cases, use the corresponding command line options for specifying another namespace, where you do have access rights.
Step 1: Write the Services of Your Application
Our Hello World program looks like follows and is available in print_env.py:
import os
import time
import hashlib

# Get the environment variables.
# The value of API_USER is set in the mesh file and therefore
# visible to the sysadmin of the application owner.
user = os.environ.get('API_USER', None)
# The value of API_PASSWORD is generated by CAS and, therefore,
# not visible even to the sysadmin of the application owner.
pw = os.environ.get('API_PASSWORD', None)

# Exit with error if either one is not defined in service.yaml.
if user is None or pw is None:
    print("Not all required environment variables are defined.")
    exit(1)

# We can print API_USER, since it, unlike the API_PASSWORD, is not
# meant to be confidential.
print(f"Hello, '{user}' - thanks for passing along the API_PASSWORD",
      flush=True)

# We print a checksum of API_PASSWORD, since we want to see
# if and when it changes.
pw_checksum = hashlib.md5(pw.encode('utf-8')).hexdigest()
print(f"The checksum of the original API_PASSWORD is '{pw_checksum}'")

while True:
  new_user = os.environ.get('API_USER', None)
  print(f"Hello, user '{new_user}'!", flush=True)
  if new_user != user:
     print("Integrity violation:"
           f"The value of API_USER changed from '{user}' to '{new_user}'!")
     exit(1)

  new_pw = os.environ.get('API_PASSWORD', None)
  new_pw_checksum = None
  if new_pw:
     new_pw_checksum = hashlib.md5(new_pw.encode('utf-8')).hexdigest()
  print(f"The checksum of the current password is '{new_pw_checksum}'",
        flush=True)
  if new_pw_checksum != pw_checksum:
     print("Integrity violation:"
           f"The checksum of API_PASSWORD changed from '{pw_checksum}' to '{new_pw_checksum}'!")
     exit(1)

  print("Stop me by executing 'helm uninstall pythonapp'", flush=True)
  time.sleep(10)
We read the environment variables periodically to be able to show below that these variables are adequately protected. In the program, we also check whether any environment variables have changed, print an error, and exit if they did. This will, however, never happen since the SCONE runtime system will detect the changes for us and not execute the program.
Step 2: Create the Manifest Files
To convert an application into a confidential application,
one needs to create a service manifest file per service,
and a mesh manifest file (a.k.a. mesh file) for your application.
This Hello World example amounts to just two files that
have already been created for you. You just need to:
- Specify an image repository where you can store the generated, confidential image: pass this along to the
run.shscript with argument-image_repo <REPO>. - Optionally, change the Kubernetes
namespaceby passing argument--namespace <kubernetes-namespace>to the run script.
service manifest
A service manifest file is a yaml file, in which you describe the service by specifying different properties. These include but are not limited to:
- Secrets the service imports and exports.
- A secret can be exported either
- to all other services (e.g., to export a public key),
- to a specific service, or
- to all services in a CAS namespace (e.g., share secrets within an application).
- The container image and repository to be used to run the service
- Environment variables
- local environment variables are kept confidential, i.e., only visible to the service itself.
- global environment variables are visible to all services in a mesh.
- Arguments
mesh manifest
An application's mesh manifest file is a yaml file, in which
you describe the application by specifying different properties. These include
but are not limited to:
- Global variables
- Services and their images
- SCONE CAS instance and namespace.
- The SCONE CAS instance can be either public or private and potentially run inside the Kubernetes cluster.
Step 3: Build and Deploy Your Application
Once you have created your manifest files, you only need to run:
./run.shUnder the hood,
run.shexecutes the following three commands: 1. Build the OCI container images containing your services and push them to your repository by executing the following command (once per service):2. Build the application mesh:sconectl apply -f service.yamlBuilding the application mesh will - connect the services and generate a helm chart intosconectl apply -f mesh.yamltarget/helmin the current directory on your local machine. - generate the security policies and global variables and upload them to the SCONE CAS instance specified in themesh.yamlfile. 3. Deploy the application using the generated helm chart:helm install pythonapp target/helm
run.sh
run.sh also installs any missing requirements (see Step 0) by calling check_prerequisites.sh, and it checks whether you have access rights to the SCONE docker image registry.scontain.com/cicd/sconecli:latest. If the latter fails, check the troubleshooting section on what to do.
Congratulations! You made it! You now have the confidential Hello World application on your Kubernetes cluster.
You can look at the log of the pod of your service by executing the following commands:
# List all pods in the default namespace:
kubectl get pods
# The name of the pod we are looking for starts with 'pythonapp-python-hello-user'.
# View the log of the pod:
kubectl logs <pod name>
The log should look something like the following:
export SCONE_QUEUES=8
export SCONE_SLOTS=256
export SCONE_SIGPIPE=0
export SCONE_MMAP32BIT=0
export SCONE_SSPINS=100
export SCONE_SSLEEP=4000
export SCONE_TCS=8
export SCONE_LOG=ERROR
export SCONE_HEAP=796917760
export SCONE_STACK=2097152
export SCONE_CONFIG=autogenerated
export SCONE_ESPINS=10000
export SCONE_MODE=hw
export SCONE_ALLOW_DLOPEN=yes (protected)
export SCONE_MPROTECT=no
export SCONE_FORK=no
export SCONE_FORK_OS=0
export SCONE_EXTENSIONS_PATH=/lib/libbinary-fs.so
musl version: 1.1.24
SCONE version: 5.7.0 (Tue Jan 18 08:45:24 2022 +0100)
Enclave hash: 0e62020589972fba3ae70225cf6cd958897bbdd5eee878c5badf5928d95cfaae
Application runs in SGX production mode
Hello, 'myself' - thanks for passing along the API_PASSWORD
The checksum of the original API_PASSWORD is 'a6f0d569c45ea68ff25d908234d3a4c6'
Hello, user 'myself'!
The checksum of the current password is 'a6f0d569c45ea68ff25d908234d3a4c6'
Stop ME by executing 'helm uninstall pythonapp'
...
In the next step, we will show you how you can verify that the password, user ID, and program indeed are protected according to our objectives.
Verify the Desired Protection Level
In the section Objectives, we stated how we wanted to protect our data and program in this tutorial. In this section, we will show you how to verify that these objectives were achieved, one by one.
To check the protection of the password, username, and program, we will need to examine the logs of the container running the
Hello Worldservice, and execute some commands inside the container itself. To perform those actions, you can use the following commands:# List all pods in the default namespace: kubectl get pods # The name of the pod we are looking for starts with 'pythonapp-python-hello-user'. # View the log of the pod: kubectl logs <pod name> # Log-in to the container of the pod: kubectl exec -it <pod name> -- sh
Protecting Confidential Resources
It is out of the scope of this tutorial to show why a malicious user, even if authorized as the system administrator of the CAS, will fail to attack the protected resources.
Verify Confidentiality Protection
One of our objectives in this tutorial is to ensure the confidentiality of our password stored in the environment variable API_PASSWORD. In contrast, both the program itself and the username stored in API_USER are allowed to be visible.
To execute the following attacks on the hello world program, log into the container as follows:
   # Log-in to the container
   kubectl exec -it <pod name> -- sh
Verify Confidentiality of API_PASSWORD
On the command line prompt inside the container, verify that you cannot read the value of the password environment variable:
echo $API_PASSWORDTo make sure the value of API_PASSWORD is not visible somewhere else inside the container, we also execute, although it will take a while to complete:
grep -r API_PASSWORD /Furthermore, you can look through the generated files in the repository to see if you can find the value of API_PASSWORD, by executing the following locally in your development environment, i.e., outside of the container:
grep -r API_PASSWORD ./targetVerify Confidentiality of API_USER
You can check whether you can read the value of the API_USER environment variable inside the container:
echo $API_USERAs you can see, it is not visible here. However, when looking in mesh.yaml (in the repository outside of the container), the application owner sysadmin will find the value of API_USER quite easily:
...
# define environment variables
env:
  - name: API_USER
    value: myself
...
This means the API_USER environment variable is not confidential. This is not a problem since it does not violate the desired confidentiality protection level.
Verify Confidentiality of the Program
Inside the container, check whether you can read the program:
grep -r "thanks for passing along" /lib -A 10 -B 20The output will be the program you wrote in Step 1 of this tutorial, i.e., the content of the repository file print_env.py.
This means the program is not confidential, but this is not a problem since it does not violate the desired confidentiality protection level.
code confidentiality
Using SCONE, it is also possible to protect the confidentiality of the code so that nobody can view the program, but we do not include this feature in this example.
Verify Integrity Protection
One of our objectives in this tutorial is to ensure the integrity of our program and our username and password, which are stored in the environment variables API_USER and API_PASSWORD, respectively.
To verify that the desired level of integrity protection is achieved, we must confirm that one cannot change those resources without the change being detected.
Verify Integrity Protection of API_PASSWORD and API_USER
To check the integrity of the password and username, we perform the following steps:
- Look in the log of the container and remember the current username and the hash of the current password:
kubectl logs <pod name>- Try to modify the environment variables
API_PASSWORDandAPI_USERinside the container:
# Log-in to the container
kubectl exec -it <pod name> -- sh
# Set the API_PASSWORD environment variable
export API_PASSWORD=incorrect_pw
# Set the API_USER environment variable
export API_USER=incorrect_user
Although we succeed in setting both environment variables, when examining the logs we see that both the username and the hash of the password are identical to the ones we remember from the previous step.
- We also want to try to modify the environment variables and restart the container. To do so, execute:
kubectl edit deployment pythonapp-python-hello-userand in the editor that opens up, add the password and username variables to the list of environment variables of the container:
...
spec:
  ...
  template:
    ...
    spec:
      ...
      containers:
        ...
        env:
          ...
        - name: API_PASSWORD
          value: incorrect_pw
        - name: API_USER
          value: incorrect_user
...
Save and exit the editor. This will create a new pod and container. 4. Verify that the username and hash of the password in the logs of the new pod are the same as the ones we remembered from the first step:
kubectl logs <new pod name>Verify the Integrity Protection of the Program
We try two approaches to verify that we cannot run a modified program without it being detected: First, we modify the program inside the container, and then we rebuild the image with a modified program and restart the container using this image. In both cases, we see that the modification is detected.
- Find the program file inside the container:
grep -re "thanks for passing along" /lib - Edit the program file by changing a message printed in the loop.
- Verify that the log message of the currently running program did not change.
- Execute the edited program in the current container by executing the command specified in
service.yaml:
python3 print_env.pyThis fails due to a signature failure.
5. To rebuild the image, modify the print_env.py outside the container in the same fashion as you did inside the container.
6. Execute:
sconectl apply -f service.yamlThis rebuilds a signed image of the modified code and overwrites the original image with the modified one. 7. Login into the container again and reboot it:
reboot- Check the logs of the newly rebooted container, and notice an attestation failure:
[SCONE|FATAL] src/process/init.c:476:__scone_prepare_secure_config(): Could not initialize enclave state: Attestation failed
  Caused by: CAS sent an attestation/configuration error: DCAP quote verification failed
  Caused by: Failed to verify DCAP report
  Caused by: The program enclave is not trustworthy
    Caused by: None of the required enclave properties are met by the enclave
    Caused by: Not all of the required enclave properties are met by the enclave
    Caused by: None of the required enclave properties are met by the enclave
    Error 1 of 2: Unexpected enclave measurement (MRENCLAVE, 0e62020589972fba3ae70225cf6cd958897bbdd5eee878c5badf5928d95cfaae) - Expected 5e753b24ae9c62c5d86f0fc6e1acb663f0debdcee99f6c327de66cbf3ce3ef66
    Error 2 of 2: Unexpected enclave measurement (MRENCLAVE, 0e62020589972fba3ae70225cf6cd958897bbdd5eee878c5badf5928d95cfaae) - Expected 2b16b78fc54fa13ce038a9abbdc7fbc4b87f12e42ca6ae07654d7d4c387ea13a
Note: Connecting to CAS at edge.scone-cas.cf (port 18765) using service ID myPythonApp/pythonapp/python3
Verify Consistency Protection
One of our objectives in this tutorial is to ensure the consistency of our program, username, and password. To verify that these objectives are achieved, we need to show that we detect if somebody has tried to revert to an older version of the application as soon as the service process starts up.
Integrity vs. Consistency
Changing the values of the username, password, and program in any other way than running an unintended, previously valid version is prevented by integrity protection, as opposed to consistency protection.
To simulate an attack on the consistency protection of one of the three resources, i.e., username, password, or program code, we first deploy the application with a new version of the resource and then maliciously try and deploy the application with the old version of the resource.
Verify the Consistency Protection of API_PASSWORD
To verify the consistency protection of the password, we would have to create and deploy a new version of the application, i.e., version 2, which only differs from version 1 in its password. The malicious attack would try to revert to using the password of version 1.
Since the password needs to be confidential, even to the sysadmin of the application owner, it is generated by CAS.
Password Roll
CAS does not regenerate the password with each new version of the application. To trigger the regeneration of the password in a new application version, we need to change the way we want it generated, for example, by changing the length of the password.
However, as soon as the password is regenerated to be used in version 2, the old password is no longer present, neither in CAS nor anywhere else, and we, therefore, have nothing to which we can revert. But let us assume that the attacker somehow had gotten a hold of a copy of the version 1 password; they would have to upload it to CAS for it to be the correct password. However, as soon as the upload to CAS has taken place, this is considered a new, authorized version, i.e., version 3.
Hence, since we didn't succeed in reverting to the password of version 1 without the change being detected, the attack on the consistency protection of the password failed.
Verify the Consistency Protection of API_USER
To verify the consistency protection of the username, we would have to create and deploy a new version of the application, i.e., version 2, which only differs from version 1 in its username. The malicious attack would try to revert to using the username of version 1.
The value of the username is specified in mesh.yaml and must be uploaded to CAS for it to be considered the correct username. To revert to the username of version 1, the attacker would thus have to upload it to CAS. However, as soon as the upload to CAS has taken place, this is considered a new, authorized version, i.e., version 3.
Hence, since we didn't succeed in reverting to the username of version 1 without the change being detected, the attack on the consistency protection of the username failed.
Verify the Consistency Protection of the Program
To verify the consistency protection of the program, we would have to create and deploy a new version of the application, i.e., version 2, which differs from version 1 in its program code. The malicious attack would try to revert to using the program code of version 1:
- Build and deploy version 2:
- Create a new version, i.e., version 2, of the program by changing
a log message printed in the loop in
print_env.pyin the repository. - Change the image tag in
service.yamlunderbuild.toto2. - Change the image tag in
mesh.yamlunderservices.imageto2. -
Build and deploy the new version, version 2, of the application:
./run.sh -
Verify that version 2 is running by making sure the new log message is printed in the logs:
kubectl logs <pod name>- Maliciously try to deploy version 1 without it being detected:
-
Push the image of version 1 to the registry under the tag
2:docker tag <image registry>/<image name>:1 <image registry>/<image name>:2 docker push <image registry>/<image name>:2 -
Deploy the fake version 2:
helm uninstall pythonapp helm install pythonapp target/helm -
Verify that the program fails:
kubectl get pods
kubectl logs <pod name>
The pod is in the Error state, and its logs show an attestation failure:
...
[SCONE|FATAL] src/process/init.c:476:__scone_prepare_secure_config(): Could not initialize enclave state: Attestation failed
  Caused by: CAS sent an attestation/configuration error: DCAP quote verification failed
  Caused by: Failed to verify DCAP report
  Caused by: The program enclave is not trustworthy
    Caused by: None of the required enclave properties are met by the enclave
    Caused by: Not all of the required enclave properties are met by the enclave
    Caused by: None of the required enclave properties are met by the enclave
    Error 1 of 2: Unexpected enclave measurement (MRENCLAVE, 51c22fa42b6970af6c44eceaab1ce7ef77385e0ddd8cb31cc4f018bcfb04d818) - Expected 8e51357d6424cf8b20c36f567ebbd4afa07c9e58912107c0beda436602c1d342
    Error 2 of 2: Unexpected enclave measurement (MRENCLAVE, 51c22fa42b6970af6c44eceaab1ce7ef77385e0ddd8cb31cc4f018bcfb04d818) - Expected 0e62020589972fba3ae70225cf6cd958897bbdd5eee878c5badf5928d95cfaae
Note: Connecting to CAS at edge.scone-cas.cf (port 18765) using service ID myPythonApp/pythonapp/python3
Troubleshooting
Installation of Rust and Cargo
Setting up Rust and sconectl
You can run script run.sh to set up / update your rust environment and to install sconectl with the help of Rust. It will, however, also execute this tutorial's build and deploy steps.
If you install manually, errors might appear since Rust is not installed or is out-of-date.
If this is the case and cargo fails, ensure that:
- you have
Rustinstalled on your system. and - it is up-to-date (you might get syntax errors if your Rust installation is old).
If Rust is not yet installed or is too old, you can use rustup to install Rust.
Docker Container Registry Access
Not allowed to pull from scone registry
This could fail for the following two reasons:
- You have not yet requested access to the SCONE registry,
which you can do by sending an email to
info@scontain.comand ask for access to theregistry.scontain.com/cicd/sconcliimage. - You have not logged in to docker using
docker loginwith the correct gitlab access token. Generate an access token and pass it todocker loginusing the--password-stdinargument.
Not allowed to push to your registry
In our experience, if the line "credsStore": "desktop" is present in your
You might not be able to push the ~/.docker/config.json file to your registry,
although you are logged in to docker and have the correct access rights.
Inconsistent Kubernetes Deployment of Application
Some Kubernetes services are configured to deploy automatically
new images as soon as they are pushed to the repository.
If this is the case, you need to run
sconectl apply -f service.yaml --no-push when building
the images of your services.
This ensures that the container image
that is generated is not pushed until after you have built the
application mesh.
Then, after applying the Meshfile, you can manually push the images for
your services using docker push.
sconectl Examples
Different command line options might be available depending on what Manifest you apply. To get a list of options for a given manifest, you can execute:
sconectl apply -f service.yaml --helpYou can print which environment variables you can define and also their default values by executing:
sconectl apply -f service.yaml -pBuilding a Service Image
We can now apply a manifest as follows (and we do not want to push it to the repo just yet):
sconectl apply -f service.yaml --no-pushDisplaying Environment Variables
We can show which variables must be defined in a meshfile using the option -p:
sconectl apply -f mesh.yaml -p